Saturday, April 12, 2008

Salvia lyrata 'Purple Knockout'

Do any of you grow Salvia lyrata 'Purple Knockout'? I bought this plant at least 4 or 5 years ago. It was a single small piece in a 4" pot.

I just finished googling this plant and it's still for sale at many places, it's the price that shocks me. One place had it listed at $9.95 in a three inch pot.

Salvia lyrata 'Purple Knockout' really is a knockout, the foliage is just lovely and I wish I had a close up of the delicate blooms.

This is as close as I could get but I'm wondering if you are seeing what I am seeing. Where are these plants growing? While I was told this plant is a perennial, I'm still not sold on that. I can never find a clump of one plant that I think was there last year. Instead, I find these beautiful seedlings in the general vicinity. The crazy thing is they never seem to seed into the beds, they seed into the crushed shell walkway.

I tried to make this photo more attractive but had no luck. This was taken along my gravel driveway yesterday morning. As you can see, I've got Salvia lyrata seedlings by the hundreds. They are lining my entire perennial border, only once again, they are not in the garden, they are in the driveway.

There is good news. The seedlings are very shallow rooted and pop right up with a dandelion fork. Almost any other seedling plucked out of the gravel this way doesn't survive well but these babies hit the potting soil running.

For the first time I've been making a concerted effort to pot them up for our Mother's Day plant sale. If we sold them for the price that's listed on the three different catalogs I just googled, we'd be rich! I just can't imagine though charging more than $3 for these sweet babies.

I'd love to hear from other people who grow this plant. I've seen it potted up in containers (it looks lovely there) but not in too many other gardens. I'm wondering if I should treat it as a rock garden plant and move it over by my succulents. It sure would be charming popping up in and out of those hens and chicks.

Any suggestions?

Friday, April 11, 2008

The Garden Gate

What kind of entrance way do you have to your garden?

In last night's adult education class we talked about garden accessories. Little things like bird houses and gazing balls and big things like garden gates and arbors.

One thing I try to stress is the first impression to your garden is an important one. You can have the most glorious garden but if the entrance is blah, then you are battling mightily to change a visitors perception.

In the opening shot here is a grand entrance way at Old Westbury Gardens. When I first started doing this program I'd tell people that this is obviously the entrance to a house but I have to change that thinking. In my neighborhood there has been a slow but steady increase of homes installing these types of grand entrances complete with wrought iron gates.

A simple entranceway I saw on a walk-about in Cape May, New Jersey. I thought this was quite elegant and immediately had you thinking that the garden beyond this gate would also be quite lovely.

If I had time to walk along the streets in our village of Huntington I could shoot hundreds of photos of charming elements. One of the past members of my garden club had this rustic entrance to her garden.

Another garden at Old Westbury, this one is hidden in the back and is a tiny vegetable garden. I love the arbor covered with runner beans and the one-of-a-kind gate.

Up in Boston I visited a botanical garden that didn't have a gate to get into their vegetable plot but these cool blue posts were welcoming enough.

Still in Massachusetts, we walked through this arbor to get into the garden. The home owner even had a mail box with maps of the garden plant material.


Heading down south to the Carolina's, we come across a cool screen door in the middle of a Hosta walk. It was fully functioning, what a fun accent piece!


Finally, close to home, only a block away, I saw this lovely lattice entrance to the garden. At the same time I could hear some barking and when I looked closely I saw the source of the noise.

How's this for an unusual door bell? Ding dong!!!

One thing I haven't included here is photos of gates in my own gardens. They will be coming at some time. In the mean time, I'm having serious deja-vu feelings that I've done this exact posting in the past. I don't know if it's true or if it's because I've done this slide program so often. If this is a re-run, please forgive me and tune in again tomorrow for something new.

Right now I've got a car chock full of plants to plant. Last night's class was such fun because not only did we do the slide program, we were able to look at lots and lots of plants. Thanks to some wonderful help up at the school I was able to transport a number of pots and clumps of perennials to the classroom. I do admit I felt a bit funny potting up some of those weeds. What a waste of potting soil :-)

Off to dig, even in the rain...

Melanie

Thursday, April 10, 2008

Psssstt...hey you!

Yesterday I was walking from my potting area to the compost heap when I heard a sound. "Pssstt... hey you." I looked around but couldn't find anybody. Suddenly I saw it, there near my feet was a magnificent clump of Sempervivum 'Oddity' (the dark green variety on the left here).

Just last week I checked out my succulents and although they looked OK, they still looked thin and cold. While the temperatures haven't warmed up dramatically, they have totally changed.

I find that the succulents plump up when they are happy. Suddenly you can see the cilia that forms the "webbing" on many varieties. Last week there was nothing to see.

The colors are changing almost daily. Sedum 'Angelina' on the left here will be a bright chartreuse in just another week or so. Up until now it was sort of a toasted orange.

Pots from last year already appear full although in many cases the soil has sunk, it's time to start dividing these babies. This is one of my most favorite tasks in the garden. I can't wear gloves for this as I just have to feel that yummy potting soil and the succulent little babies in my hands.

Look at this lovely trough. It's already nice and full, only a bit of weeding with a needle nose plier and it will really pop. In another week or two you won't be able to see the sides.

All these pots of succulents were removed from my rock garden steps for cleaning. I'll divide the ones that need it and set them back in a new arrangement. It's a wonderfully soothing job.

Surprise! This last photo was taken last night. I needed a photo for the biography I have to submit to run for our school board of education. My daughter took this for me. The photo I have on my blog is at least a year old. I've let my bleached blond grow out and have gone back to my natural color (with a few lowlights to cover some emerging grays).

Chances are you won't find me looking like this in the garden but it's much closer to what I look like than that older photo (more lines too but such is life).

Off to get ready for tonight's adult ed. gardening program. I'm going to dig up some weeds to bring in as an example and we'll view a fun program on garden accessories (junque).

Thursday's are my crazy day with selling munchies up at the school, shopping for those munchies and then class.

I'll be back tomorrow,

Melanie

Wednesday, April 09, 2008

The Whiskey Barrel

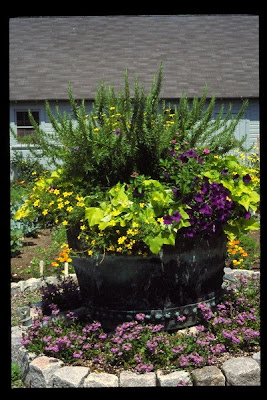
Do you have a whiskey barrel planter in your garden? Are these planters just common in the United States or are they all over the world?

Whiskey barrel's make wonderful, economic planters in the garden. They are very long lived and around here if you shop carefully you can find them for $19.99.

You definitely get what you pay for, I've seen whiskey barrels for $14.99 but the slats were broken and the metal ring that holds it all together was pretty flimsy. I've also seen them for $39.99 but to be honest, I didn't see much difference between those and the ones I bought at Home Depot for $19.99

If you want to purchase a whiskey barrel planter for your garden there are some things you need to know. Don't wear new clothing to the store. These barrels often have charred interiors and some rust on the rings. Because of the size of them you will end up hugging them against your body at some point.

Bring gloves too, your hands will get dirty and you won't want to grab your steering wheel afterwards. If you have a companion who will go to the store with you, take them along. Many times these barrels are stacked quite high and you will need help to take them apart. Finally, don't forget a large tarp in the back of your vehicle to protect your interior.

When you get your barrel home you will need a drill with a large bit so you can make some sizable drainage holes at the bottom. Think carefully about where you'll place your barrel, once it's full it's too heavy to move around the garden.

I have three whiskey barrels in my garden. They are all filled with perennials which overwinter quite well in the containers.


Not one of these photos shows a whiskey barrel in my own garden, they were all shot in other gardens. To tell the truth, I failed with my own barrel. I've had one in front of my house for years. It's tipped on an angle so it looks like the plant material is spilling out. Yet, it never looks good enough for me to photograph. I know that for sure because I just spent a half hour looking for a photo of it!

My goal is to take my barrel, remove the hosta from it, tip it all the way on the side and start all over again so it looks like the barrel in the opening shot. This time I'll take pictures.

Do you have a photo of a great whiskey barrel planting? Leave a link here so we can come visit and see what you've done.

Tuesday, April 08, 2008

Cherry Blossoms in Washington DC


This past weekend my 14 year old daughter went on a school trip to Washington DC. The news here was full of accounts of the famous cherry blossoms in bloom. Since she was taking my camera on the trip, I asked her to try to take a photograph of a cherry blossom for me.

There's a reason I labeled this post "Children's Gardens". You see, my thinking is that it's easy to give a 5 year old a seed and say "let's plant this". It's much harder to capture the interest of a child who is 10-17. My theory is that if you give them wonderful moments and memories while they are outdoors, as adults they will seek those outdoor moments again.

So here's the story of the cherry blossom photos. Sunday night we uploaded Emily's photos to the computer. I asked her to show me the cherry blossoms and she started to scroll through the file. The top photo popped up. I didn't have my glasses on and the colors were quite muted due to the overcast conditions. But, being a good mom I immediately said "ooohhh".

Emily turned to me and with that look that only a 14 year old girl can perfect, and said "Mom, those aren't cherry blossoms".

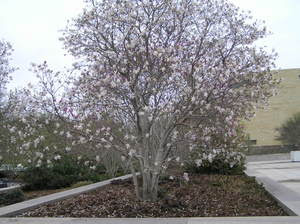
Next came this photo. I could tell it was a different type of tree so quickly I announced "aaahhh". I immediately got another look with the comment "Mom, those aren't the cherry blossoms either, I'll tell you when they're cherry blossoms".

Sheesh.

A few photos later this popped up. I had learned my lesson and kept my mouth shut. At this time Emily informed me I was looking at cherry blossoms. When I asked her why the photos were blurry, she told me that she was shooting them through the tour bus window while the bus was moving.

You don't know how happy that thought made me. There was my daughter on a bus full of teenagers and she was shooting photos of trees. My secret agenda was working!


Thanks to David Perry's wonderful tips on his garden photography blog I used the magical "crop" feature to come up with a pretty decent photo of the cherry blossoms.

The last two photos are really blurry but they also made me so happy. As Emily was scrolling through the photos she pointed out a series of shots to me. She said "Mom, there was such an awesome sunset. I tried so hard to get a good photo of it reflecting on the water but the bus just was going in the wrong direction".

The reason this made me so happy was I had asked her to photograph the cherry blossoms. Photographing an awesome sunset though was her own idea.

Joy in the beauty of nature, that's what it's all about.

Monday, April 07, 2008

Are you a One by One?


When you purchase plants for your garden, how many do you buy? Do you buy one of any given variety? Do you buy them in odd numbered lots ? Or do you fill your wagon with only one type of plant?


Up until the last year or two I was a one by one. I'd only buy one of any given variety and grow it on in hopes that I could increase it and divide it in future years. Looking at the plants in my wagon last year I can see that I only bought one of these unusual Polygonatum (can't find the name of the variety right now).

Sometimes it's the price that keeps me from buying more than one of any variety. Other times it's knowing that while I could squeeze one more plant into my straining borders, three would be too many.

Some plants seem to require more than one pot planted in a single site. I've been buying different varieties of Astrantia each year for 5 years now and still can't say I have a single area where they call out and say "look at me". As much as I love the individual bloom, I rarely find myself looking at them in the garden.

Going through my photos I could only find two examples of Astrantia even though I know for sure I have white and pale pink varieties. As you can see in this photo (besides the weeds there) when you step back only a foot or two, the Astrantia really doesn't "pop" into view at all. This would be the ideal example of the need for 3 or 5 pots of the same variety to be planted in the same location.

Tradescantia 'White Doll' is a favorite of mine. I wish I had a better photo of it, the incredible whiteness of the blooms seem to blur on my camera. 'White Doll' is a wonderfully behaved plant, it's never sent out seedlings nor underground runners into the neighboring plants. It clumps up instantly, enough that I've been able to divide it every few years to share with other people.

The best thing I ever did with 'White Doll' was the first time I divided it I planted all five divisions in the same area. Now when I dig a piece and divide it I always put one division back so there's still five plants forming a group.

Of course when it comes to Sedums and Sempervivum I only need one variety. They are so easy to propagate that I consider it a waste of my money to buy multiple varieties.

On one of the gardening lists I belong to there is a witty writer from the Netherlands named Gerrit. Just this weekend Gerrit posted about PPD (Plant Purchasing Disease) aka PAS (Plant Aquiring Syndrome). It's good to see that I'm not alone in the world but that others also share in this raging sickness.

Unfortunately, Gerrit has found that the only medicine that keeps this monster under control is Mucho Dinero and like the pharmacies in the Netherlands, the pharmacies on Long Island have not yet received any shipments of this product.

Tonight I'm giving a lecture out in the Hamptons. While I will see many other gardeners who have found the miracle drug Mucho Dinero, I'm afraid my paycheck will only be enough for a quick fix.

So tell me, when you buy plants do you buy them one by one?

Sunday, April 06, 2008

The Garden Swing

Every garden needs at least one swing.

Here at Old Country Gardens we have two kinds of swings. My favorite is the garden swing. Before I go any further, I have to thank two people for this subject. First thanks goes to my mom who bought me this swing. The second thanks goes to Sisah in Muehlenbeck Germany, just outside of Berlin. Her blog Fliesstalleben is one that I highly recommend.

A few days ago Sisah asked me about my garden bench with the red flowers. Well Sisah, it's even better than a bench because it's also a type of swing we call a "glider". It swings from the bottom instead of from the top.

The opening photo is my absolute favorite one of this spot. It's my daughter Lauren (on the left) and her friend Ana all dressed up for the high school prom. It was one of those moments in life where everything was perfect. We had 16 student couples here for a photo shoot and they spread out all over the garden. The fact that the Lonicera was in bloom at this time made this only more amazing.

A number of years ago my mom took me to a store out east on Long Island that specializes in Amish garden structures. She brought me over to this swing and told me that she wanted to buy it for me as a gift. I was thrilled!

When it was first delivered I had no idea where to put it so we put it in the lawn near some trees. It was a terrible location, there was no reason to sit there and so it was almost ignored. The next year I changed my seedling bed from farm rows to a semi-formal herb garden. It was the perfect place to move the swing.

I had always wanted to grow a Lonicera (Honeysuckle) but didn't know if they were invasive or not. It turns out that the variety I bought, Lonicera sempervirens 'Mandarin' is not invasive here. But just in case, I planted it in a large whiskey barrel planter. And there it remains, still growing strong.

If you want to read about this plant and see some close up shots you can scroll down the sideline of my blog and click on the label "Plant Profiles". There you will have to scroll down a bit until you reach the post titled "Honeysuckle Dreams".

In this photo you can see the large barrel planter at the base. There are also Lysimachia clethroides (Gooseneck Loosestrife) in the planter.


I just spent some time drawing out the actual plan of this garden on paper so I could show it here but then remembered that my daughter Emily has my camera in Washington DC right now. So here's the garden from another angle.


As a closing shot, I thought I'd show you that the swing is lovely in winter too. I'm so happy Sisah asked about it as it's one of my most favorite places in the garden. Now that the weather has warmed up a bit, I will have lunch while sitting in that swing almost every day.