Search This Blog

Saturday, February 17, 2007

What's a Filipendula without a name?


Filipendula hoosiewatsis?

Phooey, don't you just hate it when you lost the name of a plant? It drives me crazy when this happens, it's not like I don't know how important it is to keep the name of any specific plant.


About 5 years ago I was visiting Fox Hollow Farm here in South Huntington. Mary Kay always had the coolest perennials available there and many a time she urged me to buy something I had passed over. While I can't say I loved everything she pointed out, I have to admit that 90 percent of what she chose turned out to be amazing. Like the time she twisted my arm to buy a flat of left over primrose. OK, maybe she didn't have to twist too hard :-)


Well, one day she pointed out this little 4" pot. There were only two plants like it and she told me that I should make sure I took one home. Mary Kay is one of those plant people who have botanical names tripping off her tongue at the drop of a hat. Me, I'm pretty good with those names too, certainly not a Mary Kay, maybe that's why I want to pull my hair out when I've lost the name.

My luck, there was no label in the pot, and just minutes later when I got home all I remembered was that it was a Filipendula. Well, I had never grown a Filipendula and didn't even bother to look up it's requirements. For some reason I thought that it was a shade plant and so I planted it in my front (very dry) shade bed.

It's taken a few years (no wonder considering where I planted it) but this plant has grown into a huge, mature, lovely clump. This year I had several visitors while it was in bloom and all of them expressed surprise at the spot I had chosen to plant it. I guess I goofed on that one but instead of up and dying on me, this Filipendula has really put on a show.

This year it's really due to be divided as it's doing that donut thing (growing into a big circle with a hole forming in the middle). I'd really like to take a nice piece and put in a spot where it will shine but it sure would help if I knew what I was dealing with.

If you have any ideas as to the full name of this plant and it's ideal conditions please post it as a comment here for everybody to see.

Wednesday, February 14, 2007

Eye Candy!


A feast for the Eyes
(for Maria)

Wow, we've been hammered all day with an ice storm. Being stuck inside the house I thought it would be a great time to look back at some of the photos taken during spring and summer. So curl up with me in front of this here monitor and join me in a tour of Old Country Gardens.

As you can see in the opening photo, we are set back quite far from the street. Our winding driveway is approximately 275 feet long. For the most part, there are perennial borders that run down both sides.


The first pair of gardens out by the street are bordered with a natural rock wall. Supposedly these boulders were taken out of the ground here when the foundation of the house was dug. Wish we had more of them! There are a number of tall oaks and other trees out by the street throwing lots of shade here. Because of one massive Maple tree, the roots suck any moisture out of the ground so we are dealing with dry shade. One of the hardest conditions for gardening.

I just adore sharing my garden with other folks and every season a few groups tour our small piece of paradise. This past summer I had the honor of being on the national tour for the American Hemerocallis Society (that's Daylilies for you botanically challenged folks). In that one week in July we had over 600 visitors to the garden.


Our house is an old fashioned colonial with a breezeway connecting it to the garage. This photo was taken from the breezeway looking up the driveway towards the street.


Here we can see the front sunny perennial borders and how they flank the driveway.


The grass isn't always greener on the other side of the fence. One day my neighbor commented that she didn't have to garden, she only had to look over the fence to see a beautiful sight. It made me wonder what my garden looked like from her side. What do you think? I think she's pretty lucky!


When we moved in to this house, the backyard was a landscapers nightmare. Everything was in the worst possible spot and without a six figure budget, there was no easy way to work around the poor design. Two things we had right away were a pool (way too large but hey, it's already there) and a pool house. By taking the ugly white chain link fence away from the pool, it looks much more inviting.


The same year we added a huge perennial border around the back of the pool to cover an ugly slope. Our land appears quite flat to the eye but when you build a structure as huge as this pool and patio, you quickly notice which way the land rolls.


The pool house or as we call it, the cabana is just now coming in to it's own beauty. It's really just a glorified shed, holding the pool filter and all the corresponding chemicals. That extra toilet and sink sure come in handy though when your feet are covered in mud and you don't want to come in to the house.

I took this photo in May and the plant material is still quite immature. It's a good example though because it also shows off the playground equipment that was waiting here for us. We think it came from the elementary school up the street that is now a senior assisted living center. When my daughters have friends over they all gravitate to that see-saw.


My first garden here was a row of daylilies and seedlings set out like a small farm plot in the back right corner of our yard. In the past two years it's been completely changed and is now a semi-formal herb garden.


The herbs have been a wonderful companion to over 100 spider and unusual form daylilies. Unfortunately many plants in this garden have been struggling from the roots of many huge black walnut trees just over the property line. This year I will move those glorious daylilies to the other perennial borders and plant more herbs and vegetables in this spot.

By the way, I just love the way the crushed seashells look in the walkway around the center bed here. My mother gathered them over many trips to our local beaches.


Out along the back of the property line I've been working on a massive shade garden. Unlike the shade out front, this garden is not dry at all. What a huge difference it makes to have moisture and occasional moments of full sun. The plants in this garden just thrive and have been growing with leaps and bounds. Time for some serious dividing this spring!


This is one last shot of the back shade garden and it shows something that I'm very unhappy with. White fences look great if they are put in the right location. There's nothing more charming than a white picket fence out in front of a lovely cottage garden. This six foot high vinyl white fence though is the bane of my garden. I've designed my garden so that you look at the plant material, not at the enormous un-natural fence. If I have a windfall of money in the next year or two I'm going to put back the stockade fence to hide this eyesore.

Well, it's time to get back to the real world of snow and ice. Stay tuned for more garden talk! Oh, Maria, thanks for suggesting I add more photos that show off the garden :-)


Tuesday, February 13, 2007

Containers - Medium


Containers with a flair!

What I consider a medium container is one that is not just "medium" in size but also requires a bit of work to get the finished results. More than adding a few handfuls of soil but not so difficult a project that you need a rocket science degree to try this.

This first image shows a pot shaped like a head (simply called a pot-head around here). This pot charmed me a few years ago at the Philadelphia flower show and weighs enough that I was struggling by the time I got it to my car.

It has a very small place to actually put your plants and if I chose to put a single plant there, it could qualify as a "small" container. The fact that I like to plant a trio of plants, bumps this up to "medium". You see, the first year I had this pot in my garden I learned that it dries out very quickly because of the small amount of soil in the chamber. Since I don't have time to water my containers twice a day, I've learned to chose plants that don't mind drying out.

Hanging Baskets

Hanging Baskets require a bit of thought, which is why I put them in this category. Whether small, medium or large, there are a few thinks you need to consider when making a hanging basket. First of all, because this container is up in the air, you are going to see much more of the mechanics such as the underneath part of the container. Hanging plastic pots can be bought just about anywhere in the spring but I like be a bit more original. The majority of hanging pots in my garden have an open iron-like framework. In this first example though you can clearly see the terracotta colored plastic pot.

When it comes to using containers that have an open framework, you will have to decide what to use to close up that framework. This past season I tried two new products, both of which worked out very well for me. This group of hanging containers and open framework containers along my cabana are all lined with coco liners. Coconut coir fiber liners come under several different names so use what is available to you. I actually ended up buying large circular liners and pulling them carefully apart so that I'd have a number of pieces ranging from 8 inches to 12 inches. This was easier to work with and seemed to me to be a more natural look.

My favorite result came from using sphagnum moss. I wasn't sure I like this at first but it quickly grew on me. Sphagnum moss is a bit harder to work with. I bought a large cube of the moss and put it in a 5 gallon bucket. Then I added water to the bucket and let the moss soak up the water. Using a hand cultivator, I stirred the mossy soup to break up any large lumps. Once the moss was ready, I began grabbing large handfuls of the moss, squeezing out any excess moisture and then pressed it against the container frame. It's very important to remember to wear rubber gloves while doing this. The container of moss that I had purchased had clear instructions that people should handle the moss with rubber gloves and I made sure I did exactly that.

Once you've pressed moss all around the container, you should consider lining it with something or it's going to dry out every time a breeze blows by. I used landscape fabric but as I wrote in the previous posting on small containers, you can also use plastic supermarket bags with a few slits cut into them. Now you are ready to plant.


When you've finished planting your container you need to hang it up to dry. The first day it's going to drip quite a bit of water and bits of moss so don't hang it in your screen room if you don't want a puddle on the floor. Another helpful thing would be to place a large plastic bag or even an old dish washing drain under the container while working on in. There was so much moss on the ground after I had finished that I found myself trying to pick it up to use in the next planting.

Ivy turned out to be an excellent plant to include in almost all of these plantings. Every two weeks or so I'd take the longest tendrils and just wrap them further around the container. They look lovely growing on the outside of the moss. I really loved this combination of the variegated ivy and the peace lily but I have to admit that the peace lily needed more water than I was giving it.

Bird Bath Bases in the Garden

Two years ago I was walking through Main Street Nursery (in Huntington Village) when I spied these amazing containers. They kind of looked like ice-cream cones coming up from the ground. When I asked my friend Gianna about them, she told me that they were the bases of ceramic bird baths! Every now and then a shipment of bird baths has a broken piece top or bottom and it was a shame to throw out the other half of the bath. In this case they started using the bases as innovative containers. Well, I was madly in love with these and lucky enough to be the first to ask if I could purchase them.


Because these bases are actually being place up-side-down, they need some kind of support to keep them from tipping over. You can see in the photo that I used a simple wooden stake that I pounded well over a foot into the soil. Once you've got the stake firmly pounded down, you simply slip the hollow bird bath base right over the stake. When adding your potting soil you might want a second stake or garden tool to help you tamp the soil down around inside the base. then add your plant material and you have a whimsical addition to your garden.

In two of these containers I planted hardy perennials instead of annuals. The perennials came through the winter just fine and it sure lessons the amount of planting I had to do the next year (besides saving me some money at the same time).


My last container in this post is going to be the radio flyer wagon that I've been planting various succulents in for the past few years.

In the same photo you can also see my pot lady but I'm going to save her for the next installment on large containers.

The red radio flyer wagon had a mishap with a backing up car so it no longer worked well to move things around in the garden. By drilling a few drainage holes in the bottom, it became a fun focal point for my daughters playground area.

The first time I planted this wagon I put herbs and veggies in it. The herbs worked well but the celery was not happy with the shallow allotement of soil. The next year I put various Sedums and Sempervivum (hens & chicks) in the wagon and it's stayed this way for two years. The bonus with using succulents is that I've never had to water this container and yet it always looks chock full of cheerfulness.


Monday, February 12, 2007

New York Debut

Pantomime in the Bowery


Well, this seems to be the week for non-gardening topics. As an incredibly proud (busting at the seams) mom, I had to share this photo of my daughter Emily (on the left) and two mime companions as they performed this past Sunday.

It was the achievement of their young lives to be able to perform along with their entire mime troupe at the Bowery Poetry Club.

Wow Emily, your first performance in the Big Apple. Girl, you are on your way to stardom :-)


Friday, February 09, 2007

How cold is it?


In the 10 years we've lived in this house this was the first time this was possible!

This is my husband Don playing hockey on the frozen solid pool cover.

I sure wish those frozen Sedum and Sempervivum on the brick steps had a nice fluffy snow blanket to keep them warm. It will be interesting to see what actually survives after this unusual winter.

First we had the most amazingly mild December and early January and now two weeks of solid freeze.

I wonder what spring will be like.

Oh yes, click on this lower photo to see a close up of Don's face and you'll get an idea of how much he likes hockey!

(This post is a temporary one and will be deleted in a day or two)

Thursday, February 08, 2007

Containers - Small


Containers - Small, what a boring title. I would have loved to punch this up with some exciting wording, even something simple like "Contain It" but I'm trying to make it a bit easier for you to find what you need.

You see, I have so many images of fun, wacky, unusual and even just plain beautiful containers that I'd like to share. By breaking them down into categories; like small, medium and gigundo, hopefully it simplifies things. One thing to keep in mind is that if you are a beginning gardener, the smaller containers are easier to begin with but don't be afraid to try something larger too.

Something I'd like to try with this message is to add additional photos and have them interspersed throughout the blog. We'll see how that works. To begin with I chose one of the easiest plantings of all.

What you see is an old flour sifter, this one in particular came from my mother-in-law. It has everything needed to make a great container. A wide open mouth for the plant material, a handle to move it around and best of all, lots of built in drainage at the bottom.

Planted in the sifter are Hens & Chicks. To be botanically correct, they are Sempervivum and the hybrid name of this variety is 'Silverene'. What a perfect name for this container!

All I did was put a handful of potting soil in the sifter, slipped the hens & chicks out of the plastic pot I had bought them in and then slid them into the sifter. A few more handfuls of potting soil around the sides and a quick tamping down with my fingers to assure there were no air pockets in the soil and tah-dah, my wonderful creation was finished.


Well now that you saw how simple that was, I'd like to share a few more small, easy and yet totally different container plantings. Here's where we'll find out if adding more photos works out the way I'd like.


Shoes


Ok, so far, so good but I still have some experimenting to do. Shoes...they make wonderful containers in the garden. These images show two pairs of bowling shoes that have been in my garden for 3 years now. Nope, I don't even bother to bring them indoors, they just hang out all winter and come spring I add some new plant material.


To be truthful, my intention was to put the bowling balls in the garden as accents but when a fellow band parent dropped off two bowling balls with matching shoes that he found at the curb, well, I just had to do something with those shoes too!


Of course, as any woman knows, you can never have enough shoes. So sure enough, before my family members can throw any shoes away, I'm going to check them out to see if they work in my garden. These are my husband Don's old workboots. They required a bit more preparation before plantings. I was driving myself crazy trying to drill a few holes in the sole for drainage. All I kept getting was a drill bit clogged with rubber shavings. Don quickly solved the problem for me by taking his utility knife and simply scoring a few cuts in the leather near the sole.

Baskets

Baskets also make great containers for plants. A few things to remember when working with baskets. One, I like to line the basket with something to help retain the soil and keep it from drying out too fast. If you have landscape fabric, just cut a piece slightly larger than your basket, tuck it inside and trim off any edges that show. No landscape fabric? No worries, just grab one of those plastic supermarket bags, cut a few drainage slits in it and tuck that in instead.


The second thing to keep in mind with baskets is that you will not get too many seasons out of them before they rot away so don't use your Grandma's heirloom basket if you plan on keeping it for a long time.

As you can see in this photo, I hung the basket on the handlebars of an old bicycle that I prop up along our fence. Quite charming if you ask me.

The Old Standby - A Clay Pot

The last small container I'm going to feature here is a simple clay pot. The drainage is already there so just choose your material and plant it in the pot. What's different about this container is the larger container I used to showcase that clay pot. An old set of golf clubs that was hanging around in our garage for years worked perfectly to hold this container. It's just a subtle way for me to say that we have too much lawn and need more flower beds around here :-)

Medium containers will be next if this message comes through well.

Wednesday, February 07, 2007

Armchair Gardening

With temperatures hovering in the teens outside, there's not much gardening that can be done other than armchair gardening. Curling up in an overstuffed armchair with a gardening book chock full of delightful photos is the way to go.

Yesterday I visited our local public library where I picked up "Designing Borders" by Noel Kingsbury. So often I just peruse gardening books to eat up those photos and don't bother with what is written but Noel seems to have sucked me in with some great advice.

Almost immediately I noticed multiple photos that featured Verbascum bombyciferum. This wonderful biennial has been thrilling me in my garden for 5 or 6 years now and I can't wait to find more uses for it. The common name is mullein and chances are you can find it growing out of the cracks along the road somewhere. In fact, I got my first plant exactly that way, I snuck it out of the curbside of the house across the street from me! You know you have something special when visitors continue to comment on a specific plant and in the past few years the Verbascum plants here have drawn many compliments.

Even when not blooming, I love the fuzzy gray rosettes of Verbascum. Hopefully some of you will be inspired to give this plant a try too.

Monday, February 05, 2007

Winter blahs


Blah! I have the winter blahs.

We were spoiled this year, right up until mid January temperatures were remarkably mild. Oh to have one of those delightful days back. Calie and I took every opportunity to go hiking in West Hills Park or even just joint around our own neighborhood here.

The garden is so frozen now that it hurts to walk on the lawn. Crunch, crunch, it makes me cringe as I hear those tender little stalks of grass just snap into pieces.

Some soft snow sure would be a nice fluffy addition to the scenery out there. This time of year I always vow to add more evergreen shrubs but with the 7 degrees we had this morning even the Rhododendrons looked awful.

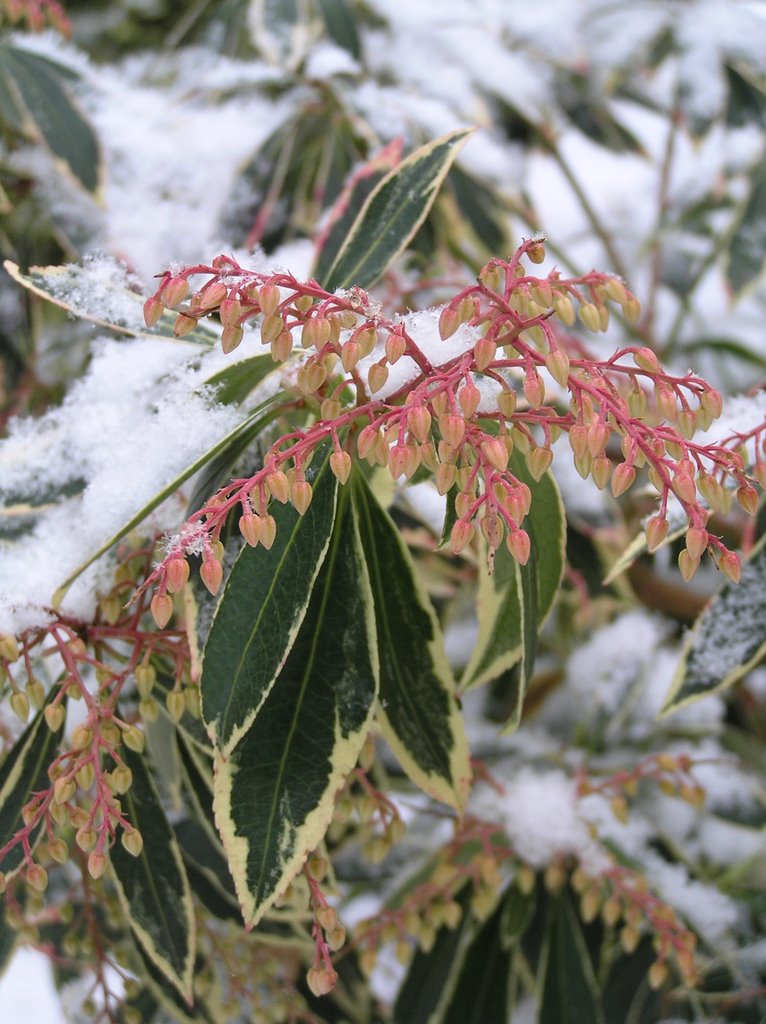
This photo is a shot of my Pieris japonica 'Silver Sword'. Probably the only thing in the garden worth photographing right now. Guess I'm off to the library to look at some gardening books and to dream.

Friday, April 28, 2006

Plant of the Day: Euphorbia epithymoides


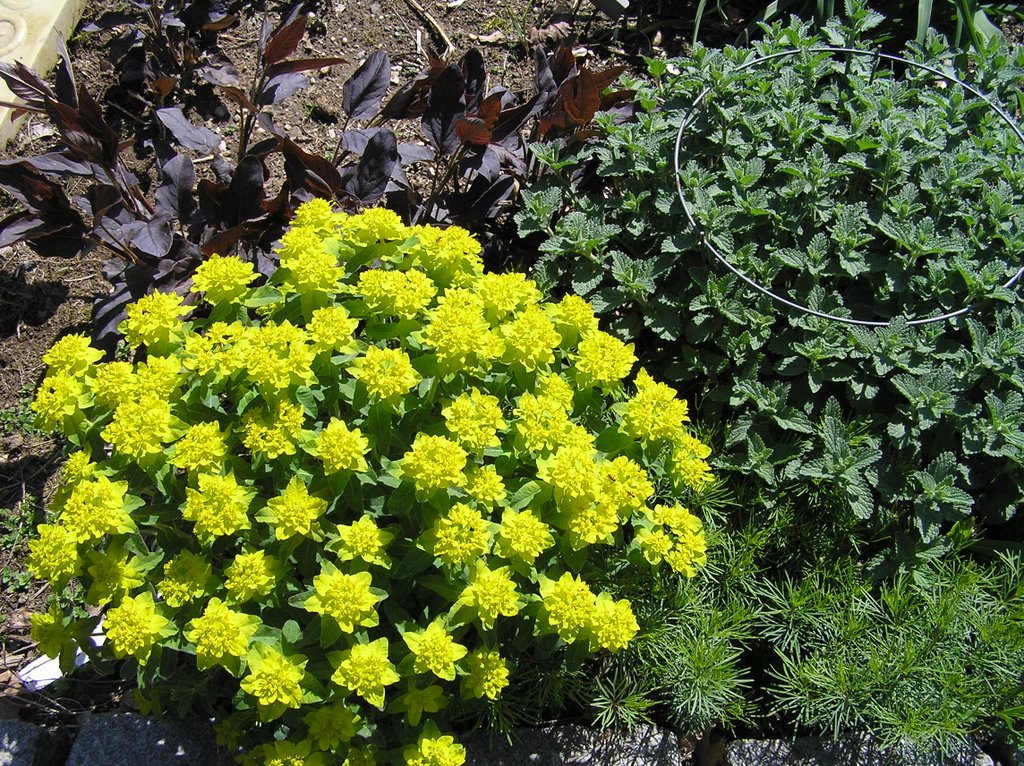
It's easy to chose today's Plant of the Day. Euphorbia epithymoides is commonly known as cushion spurge. Related to the Poinsettia it's a wonderfully easy to grow, hardy perennial here in zone 6b.

This photo was taken today in my garden. As you can see, cushion spurge adds a wonderful sunshine yellow to the early spring garden.

Combined with other perennials that have contrasting foliage, you can have a lovely area long before most plants begin to bloom. In this spot I have Euphorbia epithymoides paired with Coreopsis 'Zagreb' (thread leaf tickseed), Nepeta 'Six Hills Giant' and the wonderful purple foliage of the Lysimachia ciliata Purpurea.

Once the blooms begin to fade on your Euphorbia, you have to make a choice to let it go to seed or to cut it back before it seeds. Here in my garden I have a number of plants so I always leave some to seed. The seedlings aren't aggressive, nor do they appear by the hundreds so they are always welcome volunteers.

When cutting back the foliage on your Euphorbia you should be aware that it has a milky white sap. Some people experience a mild rash or irritation from this plant so you would want to handle it with gloves. In my own case, while I get terrible rashes from Poison Ivy, the Euphorbia doesn't bother me at all.

Transplanting of any young plants are done early in the season here before they begin to bloom. I've found them pretty tolerent of being moved about the garden.

So add a few cushion spurge to your garden, and enjoy some spring sunshine!

Thursday, April 27, 2006

unfinished draft

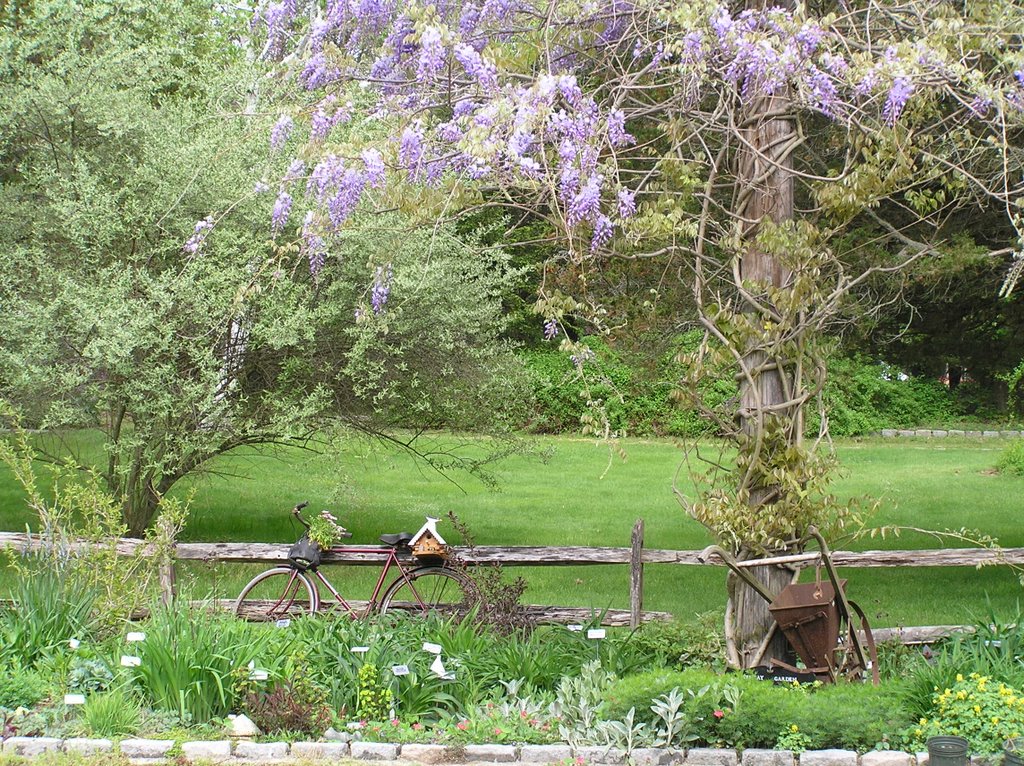
Spring of 2005 photo of one of my gardens.

Quite a nostalgic shot for me. This past January the Wisteria totaled the telephone pole. Unfortunately when the old pole collapsed they had to cut down the Wisteria.

Wrens moved into the birdhouse the same afternoon it was placed on the old bicycle. I couldn't weed there for weeks because I didn't want to disturb the babies. Did I learn my lesson? Of course not, there's a family in there again this year. So what's a few weeds anyway.

Back in the Saddle again...


Yes, yes, I know, it's a corny title but hey, it's true.

How embarrassing to look back at my blog and find out that it's been over a year since I've posted to it. Oh how sad for me.

Well, hopefully things will be looking up here and I'll be posting a bit more often (not hard when you consider my record here).

This is the big year in the garden. Hundreds and hundreds are expected to pass through and view my idea of a heavenly garden.

Thankfully the weather has been cooperating so far. We've had a fairly mild winter and a gentle if dry spring. The plants are growing by leaps and bounds now and I can't seem to find enough time to get it all done.

Am I the only gardener who can write their name in the dust on the hall table? How about sorting laundry into various baskets labeled "clean" and "not so clean"? People tell me I need a helper in the garden but I really think a house-keeper would be more useful.

Ok, no meat and potatoes here. Right now I'm digging out Lychnis coronaria (rose campion) buy the bushel full. Somebody called and asked to come by tomorrow to "buy a whole lot of rose campion".

How much is a "whole lot"? If I pot up 10 and she tells me 20 is a whole lot...well...I've lost money. If I pot up 20 and she thinks 5 is a whole lot I'm going to end up with a lot of pots of rose campion. Gardeners are gamblers by nature though so I'm going to think big.

Would dearly love to figure out how to post a photo to this blog. Will play with that this evening.

Happy digging!

Sunday, March 20, 2005

Voles - Part Two

Hi Pat and all,

Here's what I learned about voles yesterday from an avid Hosta collector. Voles are voracious eaters in the spring. You can make poison balls to put down their holes. This is what you will need:

Heavy duty rubber gloves
Heavy duty plastic bags
Plastic container for mixing (that you can throw away)
Rat Poison in a bar form
Cheap Peanut Butter

Put the rat poison in a plastic bag and bang with a hammer or mallet until it is very crumbled. Mix crumbled poison together with cheap peanut butter.
Break off pieces and roll into balls like little meatballs.
Stuff balls into vole holes.

You can freeze the unused poison balls if you do not have children around and clearly mark the container.

Saftey precaution: Wear heavy duty rubber gloves at all times. Do not use any utensils that will later come in contact with food. Preferably work in an area that will not come in contact with food (garage? shed?) Dispose of any containers that were in contact with the poison.

Stan also told me that he has great luck in the fall with the clay pot/trap/peanut butter method that was in my previous post. When I explained my dilemma about taking voles out of the traps he told me that he disposes of the whole thing, trap & vole. Traps are sold cheap, in multiple packs at the supermarket.

Good luck and let me know your favorite way to eliminate voles!
Melanie

Friday, March 18, 2005

Voles & The Queen of Backhanded Compliments

There is a woman I know from one of my garden clubs who is the "Queen of Backhanded Compliments". You know the kind, as a group of people tour your garden and wonder out loud at the beauty she steps up and says "oh yes, Melanie's garden is beautiful, for an amateur".

Yesterday I was granted a phone call from the "Queen of Backhanded Compliments". It's a wonder how this woman can know so much about everything there is to know. She's just a fountain full of knowledge and will gladly spill out and flood you with more information than you could possibly desire. In a highpitched, artificial voice (imagine Dame Edna with a nasally New York twang) the pearls of wisdom just come streaming out. Funny thing is most of the things she spouts are wrong! When talking to her in person, my favorite moment comes when she looks astonished that you didn't know the fact that she has just shared with you.

So here we were, talking about pets and I mentioned that ever since our cat died we've been noticing vole holes in the garden. I was promptly informed that she never has any voles in her garden because she incorporates daffodils with her daylilies. Did you know that Daffodils keep the voles away? Well, amazingly so, neither did I. As a matter of fact, I thought it was frittilaria that kept Moles away but no, I was wrong. All you have to do is plant lots and lots of daffodils around your daylilies and the voles won't come near them.

Imagine my surprise yesterday as I cleared the leaf debris around some emerging daffodils only to find a vole hole not more than 2 inches from the daffodil foliage. It turned out the ground was around those daffodils was riddled with vole holes, not unlike a piece of swiss cheese. Somebody should really educate those stupid voles.

Voles are little mice-like creatures that tunnel thoughout your garden and munch their way through the Hosta and Daylily roots all winter long. I've read of many different ways to rid your garden of these pests but have always found having cats was the best way. Another method that sounds reasonable is to put some peanut butter on a mouse trap, place it near the hole and cover both with an upside down clay flower pot. It seems to work for others but I just can't imagine removing the pot and finding a vole in the trap. What am I supposed to do with it then? Yuck! And what if the poor creature is not dead but only crippled. Or horror of horrors, you are in the garden and hear the trap snap? Nope, can't do that one.

How not to get rid of voles is something I'm an expert on. I thought I had it all figured out. Voles have several tunnel entrances and exits. My husband Don had a new leaf blower with an attachment that fit over the end. The attachment had a long pointed tip, kind of like an elongated funnel. Ok, I could place that long tip into one hole and turn on the blower. Surely the terrified vole would come running out of one of the exits. But what was I to do then? I knew my instinct would be to run in the other direction.

Ah Ha! At the time we had a wonderful cat named Olive who was a fantastic hunter. She had only missed this one spot in the garden. I could hold Olive under one arm and blast the hole with the leaf blower with the other arm. As soon as the vole popped up out of the exit I would release Olive and she would take care of the final extermination.

Ready...Set...Go.... On when the blower, Olive freaked out, clawed her way up my side, shoulder, neck and tried to perch on my head. I ran around the yard shrieking like a banshee and the vole never even popped up for a look. Stupid vole.

Melanie

Thursday, March 17, 2005

Sproing!!! (well it ain't Spring yet)

A lone crocus, saffron gold, wide open to catch the sunrays brought such joy to my aching heart. Yesterday's walk-about hammered home an important fact. It ain't spring yet.

The constant melt and freeze of the left over snow on our gravel driveway created huge sheets of ice. Even in the afternoon when the ice has melted, the water has nowhere to go so it just re-freezes overnight.

Viola "Bowles Black" was a gift from a garden friend several years ago. A single plant in a 3" pot it now has seeded itself sporadically across a 4' patch of the garden. On New Years day when the temperatures were mild there were quite a few blooms on this sweetheart. Yesterday's blooms were so tiny and shriveled that one could almost see them shivering, yet, the promise is there.

The Hellebores are a wonder to me. Hellebore foetidus is so heavily laden with buds that it bows down under their weight. Another promise to come, blooms will be here as soon as Mother Nature gives smiles upon us and gifts us with some gentle winds. It's almost too good to be true when one considers the beauty of the Hellebore foliage through out the rest of the growing season.

Looking carefully beyond (and trying to ignore) the carpets of chickweed I was amazed at the tapestry of winter foliage. Oenothera, the common Evening primrose has the most beautiful burgundy winter foliage. The rosettes hug the ground and spill across harsh, frozen soil.

Grayish green, the Arabis albida "Snow cap" has clambered along the new stone walls braving any weather conditions thrown its way. Just beyond the Arabis, peeping out from the dingy snow the spiky glaucus blue of the Dianthus "Doris". "Doris" might not have been the prettiest Dianthus for sale at the nursery but my middle name is Doris so of course she had to come home with me.

Hamamelis "Arnold Promise" is another late winter wonder along with all the other fabulous witch hazels. My own shrub should be renamed 'Arnold's Punishment' as it has refused to bloom for the past two years. The punishment is well deserved as I forced it to live a miserable existence in its little gallon pot along side the shed for 3 years. Just up the road at my friend Gianna's house, "Arnold Promise" is about 15 feet tall, covered in the most glorious yellow blooms and their intoxicating scent welcomes you before you even cross the property line.

Back in the house, I find myself curled up on the sofa with a huge stack of gardening books next to me. In the dead of winter I can't get enough prose. Give me pages and pages of words to stoke the dreams of my mind. Now though I want photos. Tons and tons of pictures that are chock full of color.

The wait for spring is unbearable, a physical ache. Just a few days or weeks away, around some hidden corner, spring must be waiting for us.

Melanie

Wednesday, March 16, 2005

Melanie's Old Country Garden

Hello World!

With a feeling similar to stepping out on a gangplank, I find myself here facing a blank page. Those of you who know me from various lists will agree that I do like to write down my thoughts. The rest of you hopefully will follow along and become new friends.

As the Title of my blog states, I am a gardener. Oh, that's not all, there's many things going on in my life but gardening is the passion that rules my heart and fills my senses with an indescribable joy. I could not ignore the other parts of my life, my husband Don, my girls Lauren and Emily, my wonderful Mom Carla and so many others. Yet, the main ingredient of this blog will always center around gardening.

It probably would have been smart of me to read a few other blogs before stepping into this endeavor but the need, the urge to write was too strong. Forgive me for any faux-paux that might be committed here.

Starting at the beginning would probably be a good idea. A quick overview wouldn't hurt either. I am a stay at home Mom who does quite a bit of garden lecturing, writing and photography as a small side business. Make that quite small, I'm happy if I earn enough money to fund this obsession of mine. With the need for hardscape in the garden, decks, wall stones and more, I hope to enlargen this business some day.

My garden is quite large for where we live. Here on the north shore of Long Island New York, we are surrounded by many typical surburban lots consisting of 1/4 to 1/3 acres. With luck, we found an area that still has some large parcels although many are being covered with new homes. Our own lot, is 1.3 acres. Roughly 130' wide and maybe 460' deep. Trees surround us, one neighbor has let her property go "natural", and the other side belongs to the town and is filled with wild Cherry Trees, Oaks, Maples and of course, the everpresent poison ivy.

It took two years of searching before we settled here in the summer of 1997. The house although quite charming, did not meet all of our "must have's" on the list but the large piece of property, plenty of full sun and inground sprinkler system was too good to pass up. Throw in the fact that there was a bathroom in the yard (called a Cabana by the real estate folks but more like a shed with a toilet) and there was no way we were going to walk away from this diamond in the rough.

The house was built in 1960, coincidently the same year as me :-) Modeled on an old Williamsburg Colonial, it has a wonderful stone facade, slate and oak floors, plaster walls and cast iron radiators. The old formica bathrooms though come nowhere near quaint or charming and I have to admit that they haven't been changed one bit. The gardens though... now there's where all the changes have happened.

1.3 acres, a paradise for a girl who grew up in Queens on a tiny postage stamp sized lot. I'm the first gardener to have moved into this house. The property most likely was a potato farm before this house was built here. Flat and not a tree around. The previous owners made the usual mistakes, foundation plantings that were not meant to stay low growing (yews and Rhododendrons), a smattering of Silver Maples that have become enormous and love to drop limbs here and there and the best feature of all, a Wisteria. Only problem was they had planted the Wisteria smack in the middle of the sunny 3/4 acre front lawn and proceded to treat it like a shrub. Continuosly cut back to a 3' height, it sent up many new shoots and was trimmed into the oddest ball shape. Luckily for me, they had moved a slip over to the side of the property and planted it at the base of a large telephone pole beside our driveway. With much judicious pruning from my husband Don, it now looks like a lovely tree and once it leafs out, people don't even realize that there is a telephone pole there.

At this point I don't know if I should continue with history or get into some real dirt. The real dirt, gardening is calling so strongly that I think the history will have to wait and get woven into this tapesty, my new blog, sometime in future posts.

Passion, Obsession, or what? I don't know if there is a word strong enough to describe the need to be in the garden. The obsession of a plant-a-holic, to have everything there is to be had growing in ones garden.

Up until recently I was a confirmed perennial plant freak. That's not to say that I'm no longer into perennials. Oh no, instead my passion has morphed and grown, kind of like the blob to encompase more, More, MORE of the plant world. Finally the realization that there is enough room here to go above and beyond perennials has sunk in. Last year shrubs were added like crazy, tropicals tried out in the many containers that are scattered about and thanks to two friends, even a tentative foray into the ornamental tree scene.

Collectoritis, that says it all. If I have a plant that I like and there are more types of it available, then I just must try others. More success only means more plants until I wonder at the array of growing material here. Daylily hybrids easily claim the top of the ladder. With about 600 different varieties, I just can't say no to another one. Hosta come next with just over 100 named plants. Sedum hold firmly to third place but from there the list gets misty. Close your eyes and throw a dart, your likely to hit a Heuchera, Pulmonaria, Nepeta, Echinacea, Rudbeckia, Dicentra, or a dozen other collections.

The driveway here is shaped like an elongated letter S and runs about 270 feet long. The beginning is edged in natural boulders that came from when the house foundation was built. That area is shaded by Oaks and one cursed Maple so naturally the borders there are for shade plants that will tolerate dry conditions and roots.

Further down the driveway is full sun (or close to it) on one side and 1/2 day sun on the other side. The perennial borders there are about 120 feet long and range from 6 feet wide to 12 feet wide. That number will change as soon as the ground is ready to be rototilled!

Behind our house was a yard that was a source of embarresment for many years. With the worst landscaping plans possible, the previous owner put a huge rectangular pool smack in the middle of the 1/2 acre space. What more could he do wrong? How about an enormous cement patio around the pool, angled at the front end so it looks like a large battle ship. Still not convinced of the ugly factor? Add a brick patio on the back of the house shaped like the United States of America. Yup, it really looks just like that. There's a big round area for Texas, a jutting side for California, a lip around the Bilco basement door that makes a perfect Maine and a path to the cabana for Florida. To keep it all in perspective, the battleship concrete patio is sailing right into the Gulf of Mexico. Now use a brick that's not frost proof so it shatters and chips like crazy and surround the pool with a white chainlink fence and you might get the picture.

Last year was a huge milestone around here. With the larger part of the yard now fenced in, we finally cut the white chainlink fence out. The back half of the pool has a new huge bed that's walled with wall stone, complete with huge flat stone steps.

An old seedling bed behind the pool has been turned into an amazing semi-formal herb garden. The walkway covered with crushed shells collected from our beaches looks like fallen petals from flowering trees.

The compost heap was disguised with pier pilings that a local person was having ripped out of their new yard. They became the basis for a sweeping semi shade garden that is not dry but can actually be kept moist! The new plant material I can collect for there is mind boggling.

With hopes and dreams of adding another rock garden at the front end of the pool this spring, the urge to get out there and dig is almost unbearable. Yet, the snow is still on the ground and the ten day forecast doesn't have temperatures rising out of the 40's. So dreaming is still the only way to garden and writing here will hopefully be another.

The urge has actually become too stong, boots and a warm jacket are beckoning. Just imagine what might be waiting for me out there. Snowdrops, buds on the Hellebores, the intoxicating smell of the Witch Hazel, the call of the birds returning from South.... till later,
Melanie