Search This Blog

Tuesday, July 20, 2010

Holy Cow!


This spring my friend Beth gave me some beans in trade for a cow...

Actually, Beth gave me two bean plants. She explained to me that these beans have been handed down generation after generation and came from Thomas Jefferson's garden. I'm pretty sure they are Hyacinth beans.

I have two groups of potted herbs on my back patio, so I planted the beans in a large container and placed it among those pots. Once I realized the beans were climbers, I took one of my copper stick-figure-folk and stuck it in the pot as a support.


This subject is hard to photograph. It would be better with a plain backdrop but I can't move the pot around and the thin lines of the copper pipe are hard to pick up with the camera.

Hopefully you can see the structure here and how the beans began to grow up the copper pipe.


I decided my stick-figure-folk needed a head (I named him "Tom") so I added a nice shiny copper toilet float on top.

Uh oh, those beans really started to grow and before I knew it they were encircling poor Tom's neck!


Something had to be done quickly, so I thought it would be nice to have Tom hold up an umbrella that the beans could still grow upon. Luckily I have a number of pieces of copper pipe left over from an old flower show exhibit.
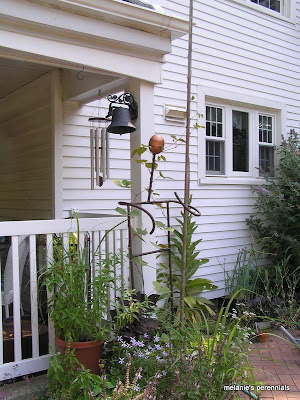

Here you can see the collection of pots, the stick-figure and the long section of pipe. Ahhh, now I felt my beans had just what they needed.

This last photo was shot this morning. At the top of the long pipe I spread out some more copper tubing to simulate the spokes of an umbrella. Unfortunately I noticed that the beans are already as high as the gutter of the house and I don't think this is nearly enough of a growing frame for them!

Looks like a trip to Home Depot is on my "to-do" list. I'm going to have to get some more copper fittings and get creative. I think I'll buy a bundle of refrigerator copper tubing and create a larger umbrella structure up top.

Anybody have a better idea? I'm listening but hurry up, at this rate there's going to be a giant climbing down this structure by the end of the week!

Fe-fi-fo-fum,
Melanie

Sunday, July 18, 2010

Bridge Gardens, Peconic Land Trust

This past Thursday I had the distinct pleasure of joining my fellow garden club members in a delightful tour of Bridge Gardens. Bridge Gardens is on the south Fork of Long Island in the town of Bridgehampton and is part of the Peconic Land Trust organization.

If you are vacationing on Long Island or lucky enough to live here, and if you are into herb gardening, I highly recommend a trip to see this place. There are lots of other things to see there too such as the perennial border pictured above but the herb garden is superb!


A number of topiaries can be found (hmmm, my spell check likes topiary and topiary's but not topiaries?) dotting the landscape. Some of them jump out at you like this trio of swans, others are more subtle.


There's a small water garden which had a nice reflection for me to play with.


As I said before, the herb garden is incredible. There was so much to see, touch, smell and photograph here. I think our club spent 45 minutes checking everything out.


There are four corners and a center planting. One corner had cooking herbs, one was medicinal herbs, one was textile/household herbs and the last was ??? (I'll guess ornamental herbs?). There were Boxwood borders, Lavender borders and Berberis borders. The Berberis (Barberry) was such a beautiful shrub and I never thought of using it this way. One warning though, it does have sharp thorns!


The brick walkway had no weeds growing in it, Rebecca and I wondered how they managed that but never got around to asking.


I took a number of close up shots such as this one of Saponaria (bouncing bet - used to make a type of soap) but I'm going to post those on my Melanie's Perennials blog. I usually try to limit my posts to 5 photos so that people who still don't have high speed internet can also view them but there's just too much to share this time.


I thought the use of pots around the garden was charming and had to take a photo of the simple cinder block used to raise the pot higher. In my own garden I've been raising pots up like this and it makes such a difference!

There's a number of pieces of artwork and sculptures around the gardens. Many of them elegant, other's are quite whimsical.

Hidden in the back (I still can't believe I found it) was a piece of artwork that's right up my alley. A lovely shopping cart with a burlap border and planted with some yummy edibles. Now you know I'm going to need one of these. In my case I think I'd plant it with kitchen herbs so I can wheel it right over to the barbeque when grilling dinner :-)

Off to spend the day trying to water the gardens. While I love swiming in my pool every day, I do wish we had a bit more rain.

Enjoy!

Tuesday, July 13, 2010

Who knew?

Wonder of wonders, the ultimate "duh" moment came yesterday when I learned the reason my laptop wouldn't connect to the internet because the wireless switch on the front of it was turned off... Oh well, I might be a great gardener but computer guru I am not!

I have so many photos to share and things to say that I'm totally backlogged...need an internet version of bran ;-)

Hope you enjoy this series of photos, I'll keep you guessing at the plant this bloom is on (until the last shot).

I had such fun taking these photos, aren't they beautiful?

The color range surprised me, while I expected lots of pinks, the yellows were totally unexpected. This one has a wonderful darker center.


From this angle you can see the pollen. Something for the bees to come buzzing around for! I never thought to look for seeds on these flowers later on but I just might remember to do that this year.

While having fun and cropping this photo I immediately thought of Kathleen McElwain. If you haven't seen some of her artwork, you should treat yourself and take a look! Just click on her name and it will take you to her site.

Last but not lease, a lighter pink. Have you guessed yet what these blooms are on? They're from my darling hens & chicks (Sempervivum)!


Sunday, July 11, 2010

Gosh Darned Computer *&^%^%

Hi all,

Been experiencing problems for days now with my laptop. Unfortunately I'm not a computer wiz and am waiting for a family member to come rescue me!

Please be patient, I have so many photos I want to share with all of you :-)

Melanie

Saturday, June 26, 2010

Gianna's Garden

If there's anybody on this planet that's more talented then my friend Gianna at designing container arrangements, I have yet to meet them. Gianna is the Queen, hands down, best container designer ever.

Anybody who lives on Long Island is lucky, you can go to Main Street Nursery in Huntington village and pick her brain any time.

I'm even luckier, Gianna (and her equally talented husband Rich) live up the street from me.

These first two shots are a patio garden on the roof of their garage. You can't imagine how delightful it is to sit up here with a cool drink and just soak in the amazing colors and forms all around you.

Today I stopped up there to congratulate their daughter on her graduation from High School. Like an idiot I forgot my camera so had to resort to my phone camera. On a recent trip to Chicago I raved about my phone camera and I still love it but I've decided I still prefer my point and shoot (press "here" dummy) camera better. The big difference is I can manipulate the point and shoot photos better.

While I'm familiar with most of the plant material (I'm just more of a perennial gardener), I'm not going to reference the various plants here. The composition of colors, textures and massed containers are all so amazing to me.

This container is my utmost favorite and I can't believe how lousy the photos came out. I will most definitely get back there with my other camera. Hopefully we have an overcast day real soon.

The amount of stunning pots filled with tropicals is mind boggling!

There's even a little fish barrel complete with fish. If I remember correctly from last year, the driftwood is to protect the fish from local predatory birds or raccoons.


Last shot for today. I took quite a few more and will post some different ones on my other blog Melanie's Perennials so if you like what you see, stop there for yet more!

Monday, June 14, 2010

All that Fluff...


I'm always touting foliage, foliage color and foliage shape. Of course the truth is it's the flower that most often takes our breath away. Blooms come in all kinds of shapes, sizes, colors and textures. When choosing a plant for a particular spot, the texture of the bloom can be very important.

In this shade planting I rely on the Hosta foliage to carry me through the season. Just look at how nicely the soft blooms on the Astilbe and the Alchemilla (Ladie's mantle) compliment the more structured foliage shapes.

Every year I moan over the fact that I don't get a good shot of Astilbe. I've got to admit that I'm pretty happy with this one even though I don't know the name of this specific variety. If I had to guess, I'd say it's 'Deutschland' but I'm really not sure.

Soft, fluffy blooms are hard to photograph. Out in the very front of my gardens is a nice big clump of Thalictrum flavum subsp. glaucum (wow, try to say that three times in a row). I've had this plant for many years, it gives me a few seedlings here and there. When I'm done typing this post I'm going to do a "plant profile" on this beauty on my Melanies Perennials blog.

Right next to the Thalictrum is a large clump of Filipendula. Another wonderful fluffy bloom, just about to burst open and such great foliage too! Last year I went crazy photographing this plant, if you type in "filipendula" in the search line at the top of this blog it will take you to that post.


Here's a pale pink variety of Filipendula further along in bloom, doesn't it look like cotton candy?

Spirea blooms and Heuchera blooms, more fluff-n-stuff... The bees were all over the Spirea but I just couldn't get a clear shot. We've got overcast skies right now so I'm heading back out there to take some more photos...


Wednesday, June 09, 2010

Step by Step

This past weekend I had the opportunity to watch my neighbors working on a great garden project. Cynthia is one of those fearless do-it-yourself ladies, ready to tackle anything. Well, this time she's decided to tackle quite a big project, a concrete walkway.

I've seen these molds for sale in the past and always thought about buying one. Thinking and doing though are different things. With Cynthia, thinking is doing and she jumped right in to the concrete making business.

As I watched her and her husband Rich mix the cement and fill the mold I thought it looked easy. To be truthful though there's still quite a bit of work involved. The site they were placing this walkway on had to be level, cleared and had landscape fabric spread on it. Unfortunately I didn't get a photo of that stage.

While I was there, they were making additional stones to use to widen a part of the walkway. Cynthia explained that it only took minutes for the cement to set, at that time you can wiggle the mold and pull it free.

24 hours later the cement is hard enough that you can walk on it without making a mark.

Here you can see how you simply fit the mold into the previous piece and continue to add cement. One 50 lb. bag of cement basically fills one mold.

Now this is the photo you've been waiting for, here's what I could see when peeking over the garden gate. How cool is this walkway! I can't wait to see the finished project.

This part of the walkway was set into place. The pieces photographed above were going to be set individually along the edges to flesh out the whole design.

All told, Cynthia said they used about 50 bags of cement. The cost for them was about $150 plus the cost of the mold. What a fantastic do-it-yourself project!


Thursday, June 03, 2010

Today's Blooms


With a enveloping fog upon us, I had to take advantage this morning and shoot some photos.

You've all seen Claus the garden gnome before, doesn't he look especially happy now that the Oenothera 'Cold Crick' is in bloom all around his head?


The Digitalis lutea is hard for me to capture with my simple point and shoot camera. It's a true perennial foxglove. Interestingly, it only blooms on one side of the bloom stalk, the blooms all facing the side where the sun is strongest.


The biennial Digitalis (foxgloves) are also in bloom all over the place. Mixed throughout them are lots of Silene (catch-fly) and Lycnhis (rose campion) blooms.


The dwarf Aruncus athusifolious (smack dab in the center here) is another plant that is hard to show off in a photograph. I just love this plant, there must be over a dozen throughout my garden and I could easily plant a dozen more.


Astrantias are just starting to bloom. I've bought a number of different varieties and they've also sent out a few seedlings so I no longer know which are named cultivars and which are not.

One plant that is rarely photographed in bloom is Alchemilla mollis. The ladies mantle is better known for it's lovely dew studded foliage but right now it's covered with clouds of simple yet elegant chartreuse blooms.

Here you can see the Alchemilla combined with a dusky Sedum and backed up by my beloved Hakonchloa 'All Gold'.


Fading into a dusty rose color are the blooms on the Physocarpus 'Diablo'. The flowers aren't very long lived but then again, I never selected this shrub for it's blooms. The foliage is the true star here along with lovely bark in the winter.


Right next to the Physocarpus is my one and only Rose, 'Westerland'. This rose has been such a beauty for me but last year I totally ruined it by cutting it back too hard too late in the season. It barely limped along and although it's not back to prime condition, I am so happy to see it blooming again.

Lots to do in the garden today...hope you are enjoying your gardens too!

Melanie

Friday, May 28, 2010

Succulents Don't Suck...(revisted)

This weekend (and much of the future season) I'll be playing with my succulents. I can't help it, they just call to me.

Earlier this morning I posted on my Melanie's Perennials blog, it too was about succulents and some of the plans I have with them.

There are so many different varieties of Sempervivum and Sedums. I don't claim to be an expert on them, I'm not even super careful about keeping their names. If I have a name, I put it in the pot. If I don't, I still grow them and love them. Many varieties were sold to me without names. They are as beautiful as the named varieties so I really just don't care.

This one I've had for 4 or 5 years now. It's been divided each and every year and makes these soft little tufts. The name on the pot was TBA, probably just stood for "to be advised".

One of the reasons I love these plants so much is because they are so forgiving of harsh conditions and so darn easy to grow! This Sedum acre is in a small, cracked plastic pot. It's grown out of the pot and along the ground, rooting in tiny cracks in the concrete.

Here's the same plant, it just crept it's way along the concrete and wound around a nearby planter. You would never know that there's no soil under here.

Every now and then an escapee finds a foothold. This is a tiny Sedum, I'm pretty sure it's name is Sedum dasyphyllum. I have no problem with it having caught hold in the cracks here, in fact I'm going to encourage it to grow!

Pots of these babies are for sale, there's not than many potted up yet and each and every one is different. The watering can is not for sale, I just adore it and can't part with it!

This afternoon friends are coming over with their children. If you do any gardening with kids you have to try these Hens & Chicks. Kids love them! I've done programs at schools and brought in pots of Sempervivum (Hens & chicks). They are so touchable, not thorny or prickly but soft and fuzzy.

The kids especially love the cobwebbed ones and love the fact that they can take them in their fingers and tease the plants apart. The whole idea of the mother plant (the hen) and her little babies (the chicks) appeals to them.

Here's a close up shot, these are just about to send out little babies and we'll be making three different pots from this one piece.

Here's one that was divided out a week ago. You can see how I left room for it to fatten up and for any babies that pop out to find a place to root.

I always add in a few non-succulent plants. This is a Saxifraga 'Cloth of Gold' that I bought yesterday. I haven't had luck with them in the past but this is a new variety for me. It's going to be paired with a beautiful blue foliaged Allium (you can see it in the top photo in the right side of the hypertufa trough).

Off to play,
Melanie